Monday, 24 March 2014

Regency officer and gentleman shirt


Pattern: Improvised (see below for dimensions)
Fabric: White linen
Haberdasheries: three mother-of-pearl buttons, red silk embroidery floss


After making the previous shirt, I read that Regency men’s shirts didn’t have ruffles on the sleeves. So I looked at paintings and fashion plates of Regency men, and though it is often hard to see, their shirts seem not to have ruffles in most cases, so I omitted them on this shirt. That made this shirt slightly different from the last one, which is nice, as I’m not that fond of making exactly the same thing twice. I also used a piece of fabric for the ruffles that was 1.5 times as long as the one I used for the previous shirt, as I thought the ruffles could do with a bit more fabric.

This type of shirt is referred to as ‘square cut’, because it consists almost entirely of squares and rectangles. The image below shows all the pieces except the collar, which is also a rectangle. Only the side bottom gussets are triangular. I cut the pieces on the grain, which makes it easier to get them neat than pinning a pattern to the linen would.
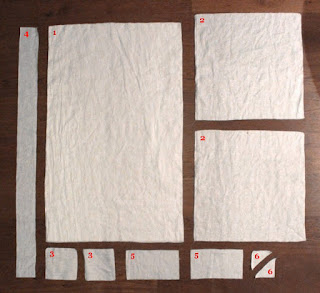

Dimensions (incl. seam allowances):

1: Body: 63 x 101 cm (cut 2)
2: Sleeves: 50 x 50 cm (cut 2)
3: Sleeve gussets: 14.5 x 14.5 cm (cut 2)
4: Neckline ruffle: 15 x 116 cm (cut 1)
5: Cuffs: 18 x 26 (cut 2)
6: Bottom side seam gussets: 9.5 x 9.5 x 13 cm triangles (cut 2)
Collar: 28 x 46.5 cm (cut 1; not in picture)

The shirt is machine sewn, with all hemming, and the buttonholes, done by hand.


 I read about embroidering a number on shirts to track progress, and did that here, too.

Thursday, 27 February 2014

Two pairs of PJs


Pattern: Drafted based on tracksuit bottoms
Fabric: Printed flannel
Haberdasheries: 1.06 m of ribbed elastic

Having a pair of tracksuit bottoms that I think have a very nice shape, and seeing a really cute flannel fabric with birds on branches, made me decide to make myself some pyjama trousers based on the trackie bottoms. Then I saw a dinosaur flannel as well, and decided to make two pairs!


I drew a pattern from the tracksuit bottoms, omitting the ribbed band of the original, but adding 3.5 cm at the top for a foldover band with elastic threaded through it, instead. I folded the band in at 2.5 cm. Here are some photos showing the steps of making the band; an easy method with a nice result, I think:


The selvedge of the fabric states: “not intended for children’s sleepwear”. Apparently this means that the fabric has not been treated with flame retardants. I think it very strange that there are countries where it’s compulsory that fabric be treated with harmful chemicals in order to be deemed suitable for children. But anyway, this fabric was not treated, so that’s good to know.

I had 2.3 m (2.5 yard) of each fabric, which was exactly enough! I needed twice the length of the trousers because the fabric was very narrow, only 1.1 m wide. I have a tendency to buy too little fabric, but this time I made a good guesstimate! I’ve got about 0.6 m2 left of each fabric, so that should be enough to make a cute baby item some day, as well.

Thursday, 30 January 2014

Ruffled curtains 2.0


A while after I made the curtains for our bedroom, I read about sleep quality, melatonin, and the importance of sleeping in a properly dark bedroom. Exposure to light at night can substantially lower your melatonin level, which lowers sleep quality, and can cause a variety of problems, from weight gain to depression. I’ve always had relatively thin curtains in my bedroom, and thought that getting as much light as possible into my bedroom would help me wake in the morning, which, er, isn’t exactly something I’m good at. But I didn’t realise the artificial light coming in as well, from street lights close to the house, may actually have been making this harder.
So I set out to replace the bedroom curtains by blackout curtains as soon as possible. I really liked the ruffles, though, so I added ruffles to these as well. Because the fabric is much thicker and less supple, they drape less well than the previous ones, but I still like them, and our health does come first.


Another nice way to improve your sleep quality is by installing the free f.lux software on your computer, smart phone or tablet. It’s not only the amount of light you’re exposed to that influences melatonin levels, but also its colour. Digital screens tend to give off blueish light, similar to daylight, so using them before bed can make you more awake. f.lux solves this by causing a sunset on your screen, and turning it slightly orange. I also find it fun that this way, I’m much more aware of when the sun actually rises and sets.

Friday, 20 December 2013

Teens blouse


Pattern: Folkwear 205 Gibson Girl Blouse, heavily modified
Fabric: Cotton batiste or muslin
Haberdasheries: 15 hooks

Next year marks the centenary of the beginning of the Great War (not called thus because it was so great to fight in it, I’m sure). The teens style had been one of my favourites for a while, so this seemed like a nice reason to start making an outfit in that style.

For my first blouse, I used the Folkwear 205 pattern. But I modified it in several ways, because I didn’t like every part of the design as it was, and also, because I had a clear image in my head of how I wanted the blouse to look.
Firstly, I wanted a front closure for practicality. I tend not to have a maid with me, so it’s really quite handy to be able to close things myself! Also, I found the suggested lace insertions a bit strange, and wanted to do vertical tucks over the entire front instead, so I combined the yoke and front part. In order to be able to take out space by making the tucks, I first had to add that space to the pattern. As the blouse did need to fit closely at the shoulders, this resulted in the blouse being quite a bit wider at the waist than at the bust, which I initially thought was a bit strange, but I saw a blouse pattern from the period online which also had this shape.
I followed the pattern for the collar, but made it a bit higher and added a very small ruffle at the top. I also lengthened the sleeved, added a tucked cuff to it, and attached a small ruffle to that as well. But I did attach a waistband according to the pattern ;).

White seems the colour of choice for most people making teens blouses, whereas I read in the early 20th century Dutch magazine De Gracieuse that they could have a wide variety of colours – even white with black stripes, and chequered! So it seemed fun to make a bright-coloured blouse. However, with the fabrics for my two planned skirts in mind, white was also the best option for my blouse.


My blouse was mainly inspired by this 1890-99 silk shirtwaist (left), and a blouse in Costume in Detail by Nancy Bradfield, p. 342 (right). Her note also made me decide to wear a brooch with it.


Here's me wearing the blouse:

Thursday, 28 November 2013

Late Victorian or Edwardian bathing suit


Pattern: For the bottom part I used the drawers from the Laughing Moon #100 Ladies Victorian Underwear pack, but closing the crotch until about halfway and attaching it to an improvised bodice. For the skirt and separate waistband I used the waistband from the Laughing Moon package, but modified slightly.
Fabric: Dark blue Dvala fitted sheet from Ikea, 180 x 200 cm, 100% cotton. I used about three quarters of the fabric, maybe more.
Haberdasheries: About 9 metres of petersham ribbon and 9 metres of ric-rac ribbon; 10 red buttons; two snap fasteners.

Bathing suits like these could consist of different parts: a sort of jumpsuit with or without a skirt over it, or a dress with bloomers underneath. I chose the first option and made a separate waistband, so that I can also wear the swimsuit without the skirt.

First, I cut the drawers from the Laughing Moon #100 Ladies Victorian Underwear pack, then an improvised bodice with the same waist circumference as the drawers. As I didn’t want any bagginess at the shoulder, this meant the bodice actually got wider towards the waist. I attached the drawers to the bodice creating a tunnel, which enables me to evenly gather the fabric at the waist before putting the skirt or separate waistband on. I based this on an image of an original bathing suit.
For the skirt and separate waistband I used the waistband pattern piece from the Laughing Moon package, modified: it is supposed to be folded in half, but I didn’t do that, and cut another piece for the inside. The skirt is just a rectangular strip of fabric 178 cm long and 65 cm high, including seams, gathered at the waist and sewn to the waistband.
I decorated everything with ric-rac ribbon sewed on top of petersham ribbon, which I think creates a nice contrast and old-fashioned look.


The suit without the skirt:


My bathing suit was mainly inspired by the images below. The one on the left is an 1893 navy blue flannel suit (agelesspatterns.com). In the middle is a 1900s British suit from the Metropolitan Museum of Art. I can’t find the source of the photo on the right, but it’s a two-piece from around 1900.


And these are the photos I tried to recreate; the one on the left is from 1910, the one on the right from 1900: