Monday 28 December 2015

My 2015 projects


Here's an overview of what I made this year! Click on the images to see more about each project.

Historical clothing and accessories

http://misshendrie.blogspot.nl/2015/02/world-war-i-vad-uniform.html

http://misshendrie.blogspot.nl/2015/04/1915-hat.html

http://misshendrie.blogspot.nl/2015/04/spring-for-cotton-project-finished.html

http://misshendrie.blogspot.nl/2015/04/1915-hat.html

http://misshendrie.blogspot.nl/2015/07/regency-fichu.html

http://misshendrie.blogspot.nl/2015/09/the-new-fashion-for-1915.html

http://misshendrie.blogspot.nl/2015/10/er-no-no-green-one.html

Historical knitting and crochet projects

http://www.ravelry.com/projects/misshendrie/wwi-cotton-bandage 

http://www.ravelry.com/projects/misshendrie/eye-bandage-no-1


http://www.ravelry.com/projects/misshendrie/kays-tess-durbervilles-shawl

http://www.ravelry.com/projects/misshendrie/susie-rogers-reading-mitts

 
http://www.ravelry.com/projects/misshendrie/perky-snood-2


http://www.ravelry.com/projects/misshendrie/riflemens-gloves

 Contemporary clothing


http://misshendrie.blogspot.nl/2015/08/my-wedding-dress.html

Contemporary knitting projects

http://www.ravelry.com/projects/misshendrie/phone-cover

http://www.ravelry.com/projects/misshendrie/phone-cover-2

http://www.ravelry.com/projects/misshendrie/berry-baby-hat-2

http://www.ravelry.com/projects/misshendrie/belle-ruffle-gloves

http://www.ravelry.com/projects/misshendrie/susie-rogers-reading-mitts-2

Montse hat

Contemporary accessories

http://misshendrie.blogspot.nl/2015/07/sleeping-mask.html

http://misshendrie.blogspot.nl/2015/08/wedding-diy_12.html

Amigurumi

http://www.ravelry.com/projects/misshendrie/pull-and-grow-amigurumi-plant


http://www.ravelry.com/projects/misshendrie/tree-love---amigurumi-tree--bird


http://www.ravelry.com/projects/misshendrie/baby-ghost-ornaments-for-halloween


http://www.ravelry.com/projects/misshendrie/witchs-cat-amigurumi


http://www.ravelry.com/projects/misshendrie/wizards-owl-amigurumi


http://www.ravelry.com/projects/misshendrie/wizards-owl-amigurumi-2


http://www.ravelry.com/projects/misshendrie/witchs-cat-amigurumi-2


http://www.ravelry.com/projects/misshendrie/witch-and-wizard-mini-amigurumi


http://www.ravelry.com/projects/misshendrie/little-pear

Happy new year everyone!
Hope to see you here again next year!

Tuesday 20 October 2015

Er, no no, the green one


Pattern: improvised, based on officer’s coat
Fabric: about 2.5 m dark green wool, about as much lining fabric
Haberdasheries: 10 large brass buttons, 6 small brass buttons

My husband and I, and some friends, had a totally brilliant civilian Regency weekend a week ago (more about that later!), and for that I made him a tailcoat. He bought green wool fabric for this a while ago, and ever since, the working title for this coat was ‘the green one’ – as in: “Er, no no, the green one. Yes, that’ll do!” I love having a man who knows his Mr. Darcy quotes! =)

I made my husband a Regency officer’s coat two years ago, and used the pattern for that to make one for this coat. Both coats are double breasted, but there are several differences, so I did have to make several changes to the pattern. For one, I made the tails quite a bit longer. The officer’s coat has a simple standing collar, but most original civilian coats I saw had a collar that was folded over, often with ‘M’ notches. Those had to grow on me, but once they did, I decided to include them, as they are characteristic of the time! Also, I made pockets with pocket flaps.


Argh, I lost my notes, so I’ll add more about making the coat when I recover them! :P
Also, I’m still waiting for photos of the weekend from the official photographer – will add those when I get them, so you can see the coat worn in context!

Friday 18 September 2015

The new fashion for 1915


Pattern: Wearing History R109 1910s suit pattern
Fabric: green linen, silk with a leaf design, thick white cotton, a strip of coutil
Haberdasheries: two snap fasteners, 16 cover buttons (23 mm in diameter)


When this pattern appeared on the Wearing History website, I immediately wanted to make it. I have loved the 1920s style for as long as I can remember, and this look, though from 1916, is very 1920s-like!

I bought the pattern as a print at home e-pattern because that was cheaper and I’d have it more quickly. At first I found sticking all the pieces together a kerfuffle, but actually it was quite fun, and I realised after that I could just cut the pattern out, rather than having to trace it. It would have been really great if there had been an overview of all the pages, though, because two pages contained nothing except the sticking lines, so I wouldn’t actually have needed to print those. I don’t like wasting paper.

I decided to fashion this suit in spring green linen, with a green silk with woven in leaf design for the collar, cuffs and cover buttons. As my fabric was thin, I lined it with thick white cotton, treating both layers as one. On second thoughts, perhaps the lining fabric was a bit too thick, because some seams became quite bulky. But this does make the jacket and skirt hems stand out a bit, which is nice.

On the original pic, the shoulder seam is neatly at the shoulder and doesn’t hang off it at all, but it did with me, whereas my shoulders are not narrow. So I sewed the sleeves in about an inch higher than the pattern said.


I folded the bottom of the jacket at 12 cm from the bottom, cut about 6 cm off and hemmed it. I also fixed the facing in place. I think the pattern suggests to leave it loose, but the silk I used frayed very much (as does all silk), and also, the facing showed a bit at the neckline when I put the jacket on.

Unfortunately the inside belt construction on the skirt didn’t work for me. It puckers and does not keep the skirt at the heightened waist typical of the period.


I must admit I’m wearing the suit without my corset here, as I don’t dare wear it anymore because it gives me numb hips… This suit is rather suitable for going corset free as the jacket is so wide, it’s definitely got a dress reform or rational dress feel about it. But it would still have looked better, and more authentic, with a corset underneath.


I’m wearing the suit with my teens blouse, 1915 hat and American Duchess Astoria shoes.


I like how this suit has turned out, and it makes me stand out a bit at events because it's more modern than what most people (depicting civilians in World War I) wear. People do notice that. I would not recommend this pattern if you want to look slim at all, though! The jacket really makes my waist disappear.

Monday 31 August 2015

Wedding DIY


Yesterday I posted my wedding dress. But that wasn’t the only homemade thing at our wedding!

Tie & pochet

Pattern: based on bought tie.
Fabric: purple satin cotton.
Haberdasheries: heavyweight sew-in interfacing, lightweight fusible interfacing.
A first: making a tie.


I wanted to make a tie and pochet for my fiancé using the same fabric I used for my dress, so we would match exactly. Also, I had never made a tie before, and that seemed fun to try.

I tried the Purl Bee tie pattern first, but the pattern pieces did not line up at all! They formed a zigzag :s. Also, the pattern did not specify at which scale to print, and how large seam allowances are!

So, I bought a cheap tie, took it apart, and traced the pieces of fabric to make a pattern. I cut the cotton fabric on the bias and added very thin fusible interfacing to the three pieces, as the fabric was rather thin.

I used the heavyweight sew-in interfacing from the bought tie, which was already cut to size and made the purple tie nicely thick and real-looking. Once I’d sewn the three pieces of cotton together, I just folded them over the interfacing and sewed them together by hand in the middle. As the loop through which the narrow end of the tie goes to secure it, I added the label from an old tie of my father’s, as a joke.

The pochet is simply a 24.5 cm square (including seam allowance), hemmed by machine. I think they’re usually larger, but the pocket it had to fit into was quite narrow, so I made this one smaller.

Petticoat

As I couldn’t find a petticoat that had the right fullness as well as the right colour, I bought two Hell Bunny petticoats in dolly pink, cut one of the two layers off one and sewed it onto the other.
Strangely, the amount of ruffling on the petticoats varied greatly; some ruffles I didn’t find full enough to peek out from under my dress, while others were fine. Obviously I picked the fullest ruffles for the outside layer.


Veil

I wanted all my accessories to be light pink, but of course, I didn’t want several different shades. So I cut my veil from the leftovers of the second petticoat, so they would at least match that. I cut three strips that were as wide as I could make them, which was 22 cm, and about 66 cm long, and the hairdresser firmly stuck them into my hair with a bobby pin each.

Shoes

I am not exactly a shoe person, and had trouble finding nice shoes to go with my dress. First I looked for light pink ones that happened to match the other light pink items, but of course there was little hope of that. Even when I just looked for light coloured shoes that I could paint in the right colour, I still didn’t find any nice ones in any shop! So I ordered these Clarks Bombay Lights online, and luckily found them quite comfortable, as well as a bit vintage looking.

I painted them with Angelus acrylic leather paint. I bought colours 191 (shell pink) and 186 (hot pink) and mixed them – and managed to get exactly the right colour! The shop assistant told me to add the darker colour to the lighter one drop by drop because the lighter one would change colour really quickly, but that wasn’t the case at all :P. Adding drops to the bottle also didn’t work, as shaking didn’t make them mix in properly, so I mixed some paint in a bowl instead. I only needed a tiny amount, even though I painted several layers. The paint worked well, and the stitching on the shoes remained nicely defined. I did find it a little sticky, and I didn’t like the ‘satin finisher’, which didn’t create a satin sheen but a very shiny one! So I decided not to use it.

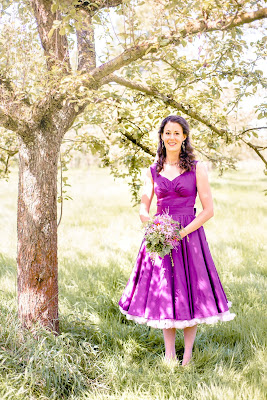
Bouquet, boutonnieres, corsages and floral arrangement


My beautiful bouquet was made by my mother! She picked the flowers at the Botanical Gardens where she volunteers. I found that, and the fact that she made the bouquet, a really nice idea. Also, this meant I saved a lot of money, but the main reason for asking my mum was that I know she’s really good at flower arranging, whereas getting the bouquet from a florist would have been a gamble tastewise. My best friend actually left her bouquet at home when she got married, because it was so not what she wanted…

My bouquet contained echinaceas, saponarias, maidenhair fern leaves, lady’s mantle leaves, anemone leaves, and one flower I don’t know the name of.

We spent a whopping €29,55 on the flowers, corsages and boutonnieres. Not too bad! This was actually spent on the basic materials – bouquet holder, florist tape and corsage magnets– as the flowers were free.


Corsages are very easy to make. The florist tape sticks to itself, and can easily be wrapped around a magnet to hold it in place. The other magnet goes behind the wearer’s garment, which is thus not damaged by a pin going through.

Guest book

 (Photo by me)
After searching for a guestbook for a little while, I realised I was actually looking for one that resembled our invitation card. So I thought: why not buy a dummy book and glue one of our surplus cards onto it? I also like the paper in dummy books – matte, cream-coloured and quite thick.

The pink hearts on the card and the guestbook matched my accessories, by the way! And the letters inside the card had the same colour as my dress.

Cake topper


Searching for nice cake toppers, I came across silhouette ones, which I really liked, also because of the historic aspect.

I did actually want the silhouette to be ours, so when my fiancé had picked up his suit and my petticoat and dress were finished, we took a photo of ourselves from the side! I cut out the silhouette on the computer and printed it onto printable shrinky dinks foil, as large as would fit onto an A4 sheet. Strangely, the shrinky dinks shrunk more widthways than lengthways, so I had to multiply the width by 1.25. But then it turned out exactly as I had hoped.

Initially I wanted the silhouette to be black, as is traditional, but the black printer ink was damaged when I cut the silhouette out before baking it. Also, I thought black didn’t really match anything and was a bit gloomy. So, as we happened to have a can of silver spray paint, I made a silver silhouette instead.
I stuck bamboo forks to the back to be able to mount it on the cake.

Photos by Happy Photographer, unless otherwise specified. The guest corsage pictures are just fragments of the photos.