Pattern: Past Patterns #031, 1796-1806 front closing gown, heavily modified
Fabric: Dark red linen, coarser
natural-coloured linen for lining
Haberdasheries: 3 pairs of hooks and
eyes, 1.5 m narrow tape
A first: Constructing and lining a Regency jacket entirely authentically

This camp follower’s jacket was a UFO for years. I don’t even remember
when I started making it, but I just didn’t think it was turning out
right, and that put me off finishing it.
Then I wanted to use it for the March challenge of the Historical Sew
Monthly which I briefly took part in in 2015, but decided to quit
that. I promised myself a while ago that I wouldn't set deadlines for myself
anymore because they make sewing stressful and definitely no fun for me, and
this sewalong provided a fresh deadline every month. I really don't want that!
I think that while this pattern has really nice parts, like the lovely
kite-shaped back panel, and the instructions for the well-fitting fichu,
its waistline is much too low. This is a pet peeve of mine as far as Regency
reproductions are concerned, anyway – the main characteristic of the fashion of
this period is that high waistline, after all! – so I always try to get my
waistline properly high, and the bodice fitting quite tightly, rather than
hanging in any way. Consequently, I modified the pattern quite a bit, removing
6 cm from the lower edge of the bodice.
As I didn’t want puffy sleeves, I used a smaller version of the sleeve
than I did of the bodice, and lengthened the sleeves as well.
I really like the fact that the historical construction of this pattern
creates a slightly recessed back panel, so I followed the instructions for the sewing and lining technique
to a tee. I also topstitched the back panel by hand (the demotivating part of
which is that if one does it neatly enough, it looks like a sewing machine was
used!). But I didn’t find the instruction on how to create those nice square
lines between the sleeves and the bodice particularly enlightening. In any
case, I put the sleeves in and ripped them out again several times, but did not
manage to create anything quite like in the pattern picture. If anyone knows
how to do this, I’d be interested to know!

My annoyance over the sleeves was one reason why this project UFOed for
so long, but recently I picked the jacket up again and had some inspiration about things I chould
change to make myself like it enough to wear it. Firstly, I used one width of
fabric for the skirt part of the jacket, and that isn’t enough to make it stand
out nicely. Too little fabric gives a column-like shape. So I used my leftover fabric
to add 50 cm more width, and moved some of the pleats to the side of the jacket
as well.
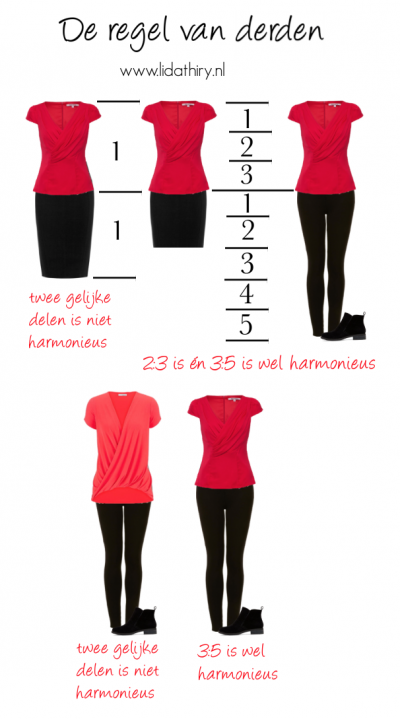
Secondly, the length of the jacket wasn’t right. I came across this
information on proportions in clothing (saying that in clothing, two parts of equal length do not constitute a 'harmonious' look, whereas 2:3 and 3:5 are harmonious):
And my jacket was the same length as the part of the dress visible below it. So
I shortened the jacket, and as trivial as that may seem, it really made a
difference.


For the drawstrings that close the jacket, I wanted to use narrow tape made of a natural
material (the authentic option, but also, polyester ribbons tend to come loose), but I could
only find bright white tape. Then I found Katia Tahiti knitting yarn in colour 8, which is
made of cotton, seems durable, and is just perfect for this purpose! And only €0.09
per m.


As the front flap closure, I sewed on three wire hooks and eyes.

Because I started off constructing this jacket entirely historically, I
found it a nice challenge to finish it using only old-fashioned techniques, as
well. So I finished the raw
edges by overcasting by hand. As I was doing this I thought it looked hideous,
but now I think it’s a nice historical detail.

I intend to make more working class Regency jackets using this pattern,
but I think I will start over with the pattern, making another toile and
modifying it a bit differently. For instance, I won’t make the shoulder straps
wider next time (no idea why I did that anyway!), and I’ll leave the bodice
slightly longer, to make my back look a bit narrower. It’s 1817 now anyway,
when waistlines were descending again!


