Pattern: improvised
Fabric: Purple wool, lots of scraps for
lining
Haberdasheries: 2,5 m narrow tape for drawstrings
A few years ago I made my first working class or camp follower’s Regency
outfit, including a wool jacket, but I was never quite happy with how the
jacket turned out. Now I’ve made a few alterations to it, and also added lining
in the way it would have been done in the day – that is, using leftover pieces
of fabric.
Three examples of patchwork lining from the period:

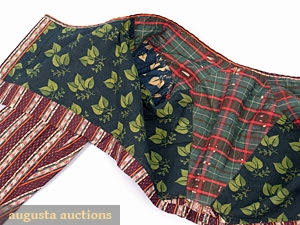

And here's my patchwork lining:


Some of the ‘scraps’ I bought especially for this purpose, but I also
used the leftovers of my patterned fichu,
pockets and a knitting huswife. So
I was limited by the size and shape of the fabric, and it was actually quite a puzzle to put all the
pattern pieces together.
A nice detail, I think, is that you can see a different lining fabric inside
each sleeve when I wear the jacket.

Because I wanted this jacket to be warm, I initially made the neckline
quite high. But besides not looking particularly elegant (and even as a camp
follower, one can strive to look elegant!), a high neckline is just not typical
for the Regency period. So I lowered the neckline by about 4 cm, and took some
fabric out of the back panel to make the sleeves start neatly on the shoulders,
rather than hanging off them a bit (the only downside to this is that the
sleeves, which were very long, another typical Regency thing, are now a bit
shorter). I also added different drawstrings at the neckline and at the waist,
using the Katia Tahiti knitting yarn that I bought for the previous campfollower’s jacket
I posted. It matches these lining fabrics nicely.


And worn with an apron.

This earlier picture is just one example of this typical manner of
wearing the apron, crossing the straps at the back and tying them at the front.
This was probably done because working class women didn’t have a maid to tie
the straps at the back!

Could the straps have crossed at the front to give them a stronger support for hitching up the apron to carry things? I also find that bringing the straps forward lets me tie it tighter and firmer.
ReplyDeleteHmm, that could be. My apron does stay in place this way, but I doubt it is in place firmly enough to carry (heavy) things in it, though. Others in my group have added bibs and shoulder straps to their aprons because they didn't stay up at all. It would definitely work like that at the natural waist, I think.
DeleteI have found crossing apron strings like that also gives a bit of back support!
ReplyDeleteThis lining is so fun! And a thrifty way to clear out all those scraps that are so hard to throw away.
ReplyDelete