Monday, 24 March 2014

Regency officer and gentleman shirt


Pattern: Improvised (see below for dimensions)
Fabric: White linen
Haberdasheries: three mother-of-pearl buttons, red silk embroidery floss


After making the previous shirt, I read that Regency men’s shirts didn’t have ruffles on the sleeves. So I looked at paintings and fashion plates of Regency men, and though it is often hard to see, their shirts seem not to have ruffles in most cases, so I omitted them on this shirt. That made this shirt slightly different from the last one, which is nice, as I’m not that fond of making exactly the same thing twice. I also used a piece of fabric for the ruffles that was 1.5 times as long as the one I used for the previous shirt, as I thought the ruffles could do with a bit more fabric.

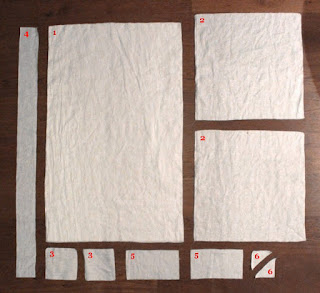
This type of shirt is referred to as ‘square cut’, because it consists almost entirely of squares and rectangles. The image below shows all the pieces except the collar, which is also a rectangle. Only the side bottom gussets are triangular. I cut the pieces on the grain, which makes it easier to get them neat than pinning a pattern to the linen would.


Dimensions (incl. seam allowances):

1: Body: 63 x 101 cm (cut 2)
2: Sleeves: 50 x 50 cm (cut 2)
3: Sleeve gussets: 14.5 x 14.5 cm (cut 2)
4: Neckline ruffle: 15 x 116 cm (cut 1)
5: Cuffs: 18 x 26 (cut 2)
6: Bottom side seam gussets: 9.5 x 9.5 x 13 cm triangles (cut 2)
Collar: 28 x 46.5 cm (cut 1; not in picture)

The shirt is machine sewn, with all hemming, and the buttonholes, done by hand.


 I read about embroidering a number on shirts to track progress, and did that here, too.

Thursday, 27 February 2014

Two pairs of PJs


Pattern: Drafted based on tracksuit bottoms
Fabric: Printed flannel
Haberdasheries: 1.06 m of ribbed elastic

Having a pair of tracksuit bottoms that I think have a very nice shape, and seeing a really cute flannel fabric with birds on branches, made me decide to make myself some pyjama trousers based on the trackie bottoms. Then I saw a dinosaur flannel as well, and decided to make two pairs!


I drew a pattern from the tracksuit bottoms, omitting the ribbed band of the original, but adding 3.5 cm at the top for a foldover band with elastic threaded through it, instead. I folded the band in at 2.5 cm. Here are some photos showing the steps of making the band; an easy method with a nice result, I think:


The selvedge of the fabric states: “not intended for children’s sleepwear”. Apparently this means that the fabric has not been treated with flame retardants. I think it very strange that there are countries where it’s compulsory that fabric be treated with harmful chemicals in order to be deemed suitable for children. But anyway, this fabric was not treated, so that’s good to know.

I had 2.3 m (2.5 yard) of each fabric, which was exactly enough! I needed twice the length of the trousers because the fabric was very narrow, only 1.1 m wide. I have a tendency to buy too little fabric, but this time I made a good guesstimate! I’ve got about 0.6 m2 left of each fabric, so that should be enough to make a cute baby item some day, as well.

Thursday, 30 January 2014

Ruffled curtains 2.0


A while after I made the curtains for our bedroom, I read about sleep quality, melatonin, and the importance of sleeping in a properly dark bedroom. Exposure to light at night can substantially lower your melatonin level, which lowers sleep quality, and can cause a variety of problems, from weight gain to depression. I’ve always had relatively thin curtains in my bedroom, and thought that getting as much light as possible into my bedroom would help me wake in the morning, which, er, isn’t exactly something I’m good at. But I didn’t realise the artificial light coming in as well, from street lights close to the house, may actually have been making this harder.
So I set out to replace the bedroom curtains by blackout curtains as soon as possible. I really liked the ruffles, though, so I added ruffles to these as well. Because the fabric is much thicker and less supple, they drape less well than the previous ones, but I still like them, and our health does come first.


Another nice way to improve your sleep quality is by installing the free f.lux software on your computer, smart phone or tablet. It’s not only the amount of light you’re exposed to that influences melatonin levels, but also its colour. Digital screens tend to give off blueish light, similar to daylight, so using them before bed can make you more awake. f.lux solves this by causing a sunset on your screen, and turning it slightly orange. I also find it fun that this way, I’m much more aware of when the sun actually rises and sets.

Friday, 20 December 2013

Teens blouse


Pattern: Folkwear 205 Gibson Girl Blouse, heavily modified
Fabric: Cotton batiste or muslin
Haberdasheries: 15 hooks

Next year marks the centenary of the beginning of the Great War (not called thus because it was so great to fight in it, I’m sure). The teens style had been one of my favourites for a while, so this seemed like a nice reason to start making an outfit in that style.

For my first blouse, I used the Folkwear 205 pattern. But I modified it in several ways, because I didn’t like every part of the design as it was, and also, because I had a clear image in my head of how I wanted the blouse to look.
Firstly, I wanted a front closure for practicality. I tend not to have a maid with me, so it’s really quite handy to be able to close things myself! Also, I found the suggested lace insertions a bit strange, and wanted to do vertical tucks over the entire front instead, so I combined the yoke and front part. In order to be able to take out space by making the tucks, I first had to add that space to the pattern. As the blouse did need to fit closely at the shoulders, this resulted in the blouse being quite a bit wider at the waist than at the bust, which I initially thought was a bit strange, but I saw a blouse pattern from the period online which also had this shape.
I followed the pattern for the collar, but made it a bit higher and added a very small ruffle at the top. I also lengthened the sleeved, added a tucked cuff to it, and attached a small ruffle to that as well. But I did attach a waistband according to the pattern ;).

White seems the colour of choice for most people making teens blouses, whereas I read in the early 20th century Dutch magazine De Gracieuse that they could have a wide variety of colours – even white with black stripes, and chequered! So it seemed fun to make a bright-coloured blouse. However, with the fabrics for my two planned skirts in mind, white was also the best option for my blouse.


My blouse was mainly inspired by this 1890-99 silk shirtwaist (left), and a blouse in Costume in Detail by Nancy Bradfield, p. 342 (right). Her note also made me decide to wear a brooch with it.


Here's me wearing the blouse:

Thursday, 28 November 2013

Late Victorian or Edwardian bathing suit


Pattern: For the bottom part I used the drawers from the Laughing Moon #100 Ladies Victorian Underwear pack, but closing the crotch until about halfway and attaching it to an improvised bodice. For the skirt and separate waistband I used the waistband from the Laughing Moon package, but modified slightly.
Fabric: Dark blue Dvala fitted sheet from Ikea, 180 x 200 cm, 100% cotton. I used about three quarters of the fabric, maybe more.
Haberdasheries: About 9 metres of petersham ribbon and 9 metres of ric-rac ribbon; 10 red buttons; two snap fasteners.

Bathing suits like these could consist of different parts: a sort of jumpsuit with or without a skirt over it, or a dress with bloomers underneath. I chose the first option and made a separate waistband, so that I can also wear the swimsuit without the skirt.

First, I cut the drawers from the Laughing Moon #100 Ladies Victorian Underwear pack, then an improvised bodice with the same waist circumference as the drawers. As I didn’t want any bagginess at the shoulder, this meant the bodice actually got wider towards the waist. I attached the drawers to the bodice creating a tunnel, which enables me to evenly gather the fabric at the waist before putting the skirt or separate waistband on. I based this on an image of an original bathing suit.
For the skirt and separate waistband I used the waistband pattern piece from the Laughing Moon package, modified: it is supposed to be folded in half, but I didn’t do that, and cut another piece for the inside. The skirt is just a rectangular strip of fabric 178 cm long and 65 cm high, including seams, gathered at the waist and sewn to the waistband.
I decorated everything with ric-rac ribbon sewed on top of petersham ribbon, which I think creates a nice contrast and old-fashioned look.


The suit without the skirt:


My bathing suit was mainly inspired by the images below. The one on the left is an 1893 navy blue flannel suit (agelesspatterns.com). In the middle is a 1900s British suit from the Metropolitan Museum of Art. I can’t find the source of the photo on the right, but it’s a two-piece from around 1900.


And these are the photos I tried to recreate; the one on the left is from 1910, the one on the right from 1900:


Friday, 22 November 2013

Dressing a Highland officer of the Napoleonic era


It was rather quiet here for a few months, because I was working on a big project – dressing a highland officer of the Napoleonic era. This outfit comprises a shirt, neck cloth, waistcoat, jacket, tartan trews, humble bonnet, and a black cape. I did not design these myself, but instead, tried to make them as much like the originals would have been, as possible.

Patterns: drafted from other people’s reproduction clothes.
Fabrics: white linen, black linen, 100% wool in scarlet and ochre, 100% wool Gordon tartan fabric, dark blue wool, black wool.
Haberdasheries: 52 regimental buttons (10 on the waistcoat, 42 on the jacket), 5 brass buttons, about ... m silver and black lace (woven band), 4 embroidered thistles, silver fringe, red, white and dark green satin bias band, brass lion head cape closure.

About the Gordon Highlanders

The Regiment of Foot, the Gordon Highlanders was raised by the 4th Duke of Gordon in 1794, during the French Revolutionary Wars (1792 to 1802; followed by the Napoleonic Wars, 1803 to 1815). A well-known story is that the Duchess of Gordon, Jean, helped recruit privates, and offered a kiss to each who joined. The image on the right, a watercolour by William Skeoch Cumming, shows the Duchess recruiting, although it was painted in 1897, so it may not be an entirely correct depiction of clothing and circumstances.
The regiment earned its first battle honour in Holland, at Egmont-op-Zee, and also fought in Egypt in 1801, the Peninsular War from 1804 to 1814, and of course at Waterloo in 1815, where it played an important role in Napoleon’s final defeat.

After the Napoleonic Wars, the 92nd R.o.F. served in India, again in Egypt, in Sudan, and in South Africa, during the 1st and 2nd Boer Wars. About 50,000 Gordons served In World War I, of whom approximately 27,000 were killed or wounded. In World War II, the regiment achieved great success in the North African campaign, Sicily and Italy, advanced into Germany, and liberated Burma.

In 1994, the regiment became part of The Higlanders, the new regiment of the north of Scotland, which also included the Seaforth and Cameron Highlanders. In 2006, The Highlanders were fused with Scotland’s five other infantry regiments, to form The Royal Regiment of Scotland.

About the uniform

The uniform below is a reproduction of the type of uniform worn at Waterloo by lieutenants of the 92nd Gordon Highlanders.

The original regimental attire is described as follows in The Life Of A Regiment, The history of the Gordon Highlanders from its formation in 1794 to 1816: “They wore the full Highland dress or “breacan an-fhéilidh” – that is, plaid and kilt in one, called in Regimental Orders “the belted plaid.” The officers had twelve yards, or rather six yards double-width, of Gordon tartan, but of rather a smaller sett than was afterwards used. The rank and file had a smaller quantity. The officers’ purse [sporran] was badger-skin, having a silver rim round the top, and six silver-mounted tassels. The purses of the rank and file were of grey goat-skin, with six white tassels. The hose of all ranks were cut out of the strong red and white tartan cloth known in the Highlands as “cathdath” or “battle colour,” which was worn by all Highland corps, and by the better class of civilians when in Highland dress. The rosettes and garters were scarlet; the sash was crimson, and was worn over the left shoulder by both officers and sergeants. The officers wore a gilt gorget.
(...) The head-dress consisted of the round bonnet then commonly worn in Scotland, but cocked and ornamented with ostrich feathers, and having a diced border of red, white, and green, said to represent the “fess chequé” in the arms of the Stuart kings. It had a hackle fastened over the left ear by a black cockade, with regimental button on it. This hackle was white for the Grenadier Company, green for the Light Company,  and for the battalion companies the lower half was red and the upper white.
The jacket was scarlet for officers and sergeants, and red for the rank and file, with lapels turned back with yellow, showing the waistcoat, and laced two and two; lace silver with blue thread in the centre; silver or plated buttons, with the number of the regiment in the centre. Epaulettes – two for all ranks of officers, of silver bullion, having two stripes of yellow silk in the centre of the strap, with a gold-embroidered thistle and a binding of blue round the edge. The n.c. officers and men had white tufts for battalion companies and wings for flank companies. The officers’ waistcoat was scarlet, laced with silver.
(...) The officers were armed with the Higland claymore, worn at the back, fastened by an oval breastplate of silver, having a crown and thistle, surrounded by the words “Gordon Highlanders”; they had also a silver-mounted dirk. The sergeants with claymore and pike. The rank and file carried flint-lock muskets, the barrels brightly polished, and bayonets.”
 
Sources:
The Gordon Highlanders Museum website
The Life Of A Regiment vol. I, by Lt.-Colonel C. Greenhill Gardyne, 1901

Making the uniform

The items I made are a shirt, neck cloth, waistcoat, jacket, tartan trews, humble bonnet, and a black cape. The kilt and feather bonnet are the only things I did not make!

Shirt

I started with the white linen shirt, which I made longer than a gentleman’s shirt would generally have been, because it is mainly worn under a kilt, and kilts are made of prickly wool! The longer the shirt, the less leg-kilt contact. I read about the idea of embroidering a number on each shirt you make, and thought that was a fun way of keeping track of sewing progress, so I incorporated it. This is the second shirt I made; a few years ago I made the first, and this one is definitely an improvement, if only because I made the first one out of an old sheet (cotton). Linen is better!

Waistcoat

I made the waistcoat before the jacket, because I wanted to make sure the jacket actually fit over it.
The waistcoat is made of scarlet wool fabric, and lined in white cotton and linen mix. It has slit pockets on both sides, and 10 buttons with the number 92 on them.


Cape

The cape was relatively simple to make. It is made of black wool and lined in white linen. It approximates a half circle, with seams at the shoulders for a good fit. The brass lion heads keep the cape closed at the neckline, but the seams are what keeps it in place.

Jacket


Humble bonnet

The ‘humble bonnet’ was worn by soldiers and officers when not in battle or on parade. I made this officer’s version by weaving red, white and dark green satin bias band for the border, basting it in place, and then sewing the wool brim and linen bottom border onto it. The pompom is made of wool knitting yarn.

Trews

I based the tartan trews on a pair of gentleman’s breeches I made before, lengthening the pattern and also combining the front and back part of the leg. Because any seam in the tartan fabric tends to be very visible, it was preferable not to have a side seam. I placed the pattern on the fabric in such a way that both sides of the trews were exactly mirrored, and tried to make the tartan match on the seams wherever possible.